8.31.2011

fun with friends!

Elliot has had lots of visits with friends over the past week.  Here are a few of her favorite girls:
Amy and Kay--two parts of the BFC.  They gave Elliot some good advice on debutantes, jean diapers (jiapers) and turkey.

Can you tell how excited Elliot is to hang out with cousin Anna Nichole?  She was loving their "matching" outfits ;)

Ahhhh, sister time.  Love this picture of Elliot and our "fake" daughter Rachel.  Can't believe Rachel is a Mrs now!

Elliot had a styling session with resident fashionista Chelsea.  They talked mixing patterns, textures and hair accessories (we're still waiting on that last one, hahahaha.

8.30.2011

warrior dash 2011

This past Saturday I participated in the Warrior Dash in Huntersville, NC.  It was the first time that the race came to the Carolinas and the crowds were seriously ridiculous.  I found out about the race via a sidebar advertisement on Facebook so I had no idea of he legitimacy (or lack thereof) for the race series.  Well friends....the Warrior Dash race series is legitimate.  Its also crazy. And difficult. And full of insane and hilarious and hungover (and some insanely hilarious hungover) runners.  I don't think I'll forget this race experience any time soon.

I've been running for the past three years and participated in a number of 5ks, 10ks and even several half-marathons.  It was around this time last year when I found out that I was pregnant with our daughter.  I was deep into training for my first marathon when I the pregnancy test came back positive.  I was so very excited to be pregnant, but a little sad to be shelving my marathon dreams.  I was really active during my pregnancy, even running two half marathons (albeit much slower!)  I even managed a slow jog the week Elliot was born (come to think of it, we're pretty sure that was part of what brought her 10 days early!)

I've been anticipated my running come-back for several months.  I searched for a race that I could get excited about, but not stress about.  I had no idea what to expect from my post-pregnancy body and didn't know when I'd be back to good racing form.  I needed a race to inspire me.  And then I found it: the Warrior Dash.

I've already blogged about the race series, so I'll just post a few pictures from this past weekend to share the fun with you.  It was pretty good trail 5k with some seriously fun (and tough!) obstacles.  The race was certainly not for the faint of heart and I'm still nursing a few bumps, bruises, cuts and sore muscles!

elliot was so excited about the race. she was a great cheerleder!

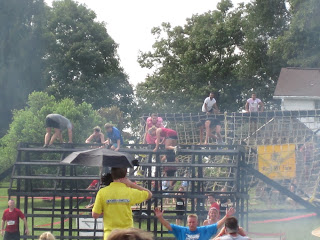
cargo net climb, jungle gym, fire jump
mud pit and barbed wire
there was a costume contest so i wore this old bridesmaids dress.  fingers crossed for the win!

elliot doing "blue steel" with the warrior hat

cutest little warrior

pre-race family photo op

the bubble gum pink dress made me pretty easy to spot!


the photo doesn't quite capture the form or beauty of my fire jumping prowess

I had an amazing jump into the mud, but alas, we missed getting it on camera

so graceful!

post-race curtsy.  the dress demanded it.

seriously?  this tiny towel to clean off? i mean, that's pretty cheap warrior dash!

time chip=free beer.  i traded mine in for bottled water. may have considered a beer if hadn't have been bud light.

hard-earned finisher's medal

8.29.2011

cook it: white chocolate raspberry cheesecake

Monday is a night for girlfriends.  My girlfriend Allison comes over after work and we giggle, gossip and watch Bachelor Pad.  It is good for me to start my week with her!

So, in honor of good girl friends, I'm posting a winner of a recipe.  Bake this cheesecake, invite over your closest girls and turn on some seriously-so-bad-its-so-good reality tv. 

*note, I made this with raspberry preserves because its Josh's favorite.  I think this recipe would be great with any preserve though.  My mother-in-law gave me some homemade blackberry preserves---can't wait to try those out!


be still my heart.


Crust
1 1/2 cups chocolate cookie crumbs or 20 crumbled Oreo cookies (filling removed)
1/3 cup margarine, melted

Filling

1/2 cup raspberry preserves
1/4 cup water
4 8-ounce pkgs. cream cheese
1 1/4 cups granulated sugar
1/2 cup sour cream
2 teaspoons vanilla extract
5 eggs
4 ounces white chocolate, chopped into chunks

Optional Garnish
2 ounces shaved white chocolate
whipped cream

Directions:
1. Preheat oven to 475 degrees. Place a large pan or oven-safe skillet filled with about 1/2-inch of water into the oven while it preheats. This will be your water bath.

2. Combine the raspberry preserves with 1/4 cup water in a medium microwave-safe bowl. Heat for 1 1/2 minutes on high in your microwave. Stir until smooth. Strain to remove the raspberry seeds (toss 'em out), then let the strained preserves sit to cool, then put the bowl in the refrigerator until later.

3. Measure 1 1/2 cups chocolate cookie crumbs (or crush 20 Oreo cookie wafers -- with the filling scraped out -- in a resealable plastic bag) into a medium bowl. Mix in 1/3 cup melted margarine. Press the crumb into a 9-inch spring form pan that has been lined on the bottom and side with parchment paper. Use the bottom of a drinking glass to press the crumb mixture flat into the bottom of the pan and about 2/3 the way up the side. Wrap a large piece of foil around the bottom of the pan to keep the cheesecake in the water bath. Put the crust in your freezer until the filling is done.

4. Use an electric mixer to combine the cream cheese with the sugar, sour cream, and vanilla. Mix for a couple minutes or until the ingredients are smooth and creamy. Be sure to scrape down the sides of the bowl. Whisk the eggs in a medium bowl and then add them to the cream cheese mixture. Blend the mixture just enough to integrate the eggs.

5. Remove the crust from the freezer and sprinkle 4 ounces of white chocolate chunks onto the bottom of the crust. Pour half of the cream cheese filling into the crust. Drizzle the raspberry preserves over the entire surface of the filling. Use a butter knife to swirl the raspberry into the cream cheese. Just a couple passes is fine, you don't want to blend the raspberry and cream cheese together too much. Pour the other half of the filling into the crust.

6. Carefully place the cheesecake into the water bath in the oven. Bake for 12 minutes at 475 degrees, then turn the oven down to 350 degrees and bake for 50 to 60 minutes or until the top of the cheesecake turns a light brown or tan color. Remove the cheesecake from the oven to cool. When the cheesecake is cool, use the foil from the bottom to cover the cheesecake and chill it in the refrigerator for at least 4 hours.

7. Before serving, sprinkle the entire top surface of cheesecake with 2 ounces of shaved white chocolate. To serve, slice the cheesecake into 12 equal portions. Apply a pile of canned whipped cream to the top of each slice and serve.

8.26.2011

elliot weekly: week 21


happy at 21 weeks!

What we've been up to this week:

Mouthful: Elliot has been putting her toes in her mouth.  It is really cute until she chokes herself.  Yep, she's been trying to get her whole foot in her mouth and choking on her big toe in the process.  Its one part cute, one part alarming.

Missing Bottom Lip: Elliot has really gotten into sucking her bottom lip.  She hums and makes all kinds of noises while sucking her bottom lip up and under her top lip.  It makes for a very funny, and very drooly, baby face.

Rocking and Rolling: Elliot is going craaaazy in her exersaucer.  My boss is letting us use his grandson's exersaucer while we're at work.  Its very similar to the one we have at home.  Its like a combination of a johnny jump-up and a traditional exersaucer.  Here she is going at it:


Party Like its 4am: Yep, she's still waking up.  All.the.time.  Josh and I are doing everything we can think of.  We're feeding her a big bottle at 10pm (or 10:30pm) and she wakes up at 4am.  As soon as she gets her chupa in, she immediately calms down and falls back to sleep....only to wake up and repeat the process at 5am, 6am and 7am (if not more frequently!)  She's still nursing and doing great.  Our pediatrician isn't in a hurry to move her to solids, and neither am I.  She's great at 50th% for weight, so I know she's getting enough food.  I wonder if there is just something weird going on in our house during the night that we don't know about?  Maybe the air conditioning hits her crib?  Any suggestions??

8.24.2011

cook it: power balls

picture stolen from the internet
ooops ;)
Power Balls:
1 cup Peanut Butter
1 cup Honey
1 cup Dark Chocolate bits
1 cup Oats
1/2 cup Dried Cranberries (you can use raisins, but yuck, why would you?!)
2 cups Pretzels (crushed)

Directions:
1: mix honey and peanut butter together until smooth
2: add in dark chocolate, oats and cranberries
3: roll into small balls, rounded tablespoon is plenty big. trust me, these are filling!
4: roll power ball into crushed pretzels
5: store in air-tight container in fridge or freezer

makes about three dozen, which is plenty to share!

8.19.2011

elliot weekly: week 20

such a happy baby!


What we've been up to this week:

4 month check up: The big news this week was Elliot's four month check up.  She'll be 5 months old in about 10 days, so its weird to have just had her 4 month appointment.  I still haven't figured out how they calculate ages for appointments at the children's clinic here!  The good news is that our little babe is really healthy.  Her measurements and skills are measuring normal, even though I swear she's above average ;)  The only thing Dr. Mark said she needed to work on was her hair.  Well, if she takes after me she won't get much until around her 2nd birthday!  Oh how we love our little follicularly challenged baby girl hahahahaha.

All giggles: Elliot has had several more laughs and I still haven't been able to capture any on camera!  Josh and I are usually dancing around (or high-fiving) and trying to get her to repeat her performance.  She just looks at us like we're morons (which we most certainly look like at the moment!)

Grabby Grabby: Elliot has been grabbing lots lately.  She'll reach for a pacifier, a toy or your hair (she's slowly ripping out all the little hairs behind my ears--ouch!)  Case and  point:
this photo shoot is over!
Why the face: Elliot is making some funny faces.  I like to give her a voice (and words!) to her faces.  She looks so hilarious when she raises an eyebrow or furrows her forehead.  She only holds the face for a second or two, because as soon as I see it I bust out laughing and then she does her pull-back-her-head-and-give-a-triple-chin smile.  Every once and a while I can get a picture of one....
i am NOT liking this outfit
Because everyone needs just one for picture of E:
happy weekend y'all!

8.17.2011

lookin' good baby

Sorry I have been MIA.  I've been recuperating with the cutest patient ever:

happy as a clam.
not sure what clams have to be so happy about
but she's just as happy as one!
Elliot had her 4 month check up on Monday and baby girl is looking good!  She weighed in at 13 pounds 3 ounces and is 25 inches long, which puts her at 75% for height and 50% for weight.  Its the exact same percentages as her last check-up!

She had more immunizations this time and she handled them better than before.  We gave her some Tylenol before her appointment (as advised by her physician) since she was so very fussy after her first set of shots.  Her first immunization was oral.  The nurse wasn't quite sure how Elliot would handle it, so she only gave her a little taste.  Elliot reacted by grabbing the nurses hands and trying to sit up in an attempt to get more of the liquid from the dropper.  The nurse laughed as Elliot sucked on the dropper so hard that she had to pry it out of Elliot's hands!  The shots were not as friendly.....Elliot looked at us as she cried as if to say "WHAT THE HECK?!?!"  I shoved her chupa in her mouth and she was immediately calmed....still teary-eyed, but calm.

I made sure to give Elliot another dose of Tylenol when she went to bed and she slept so much better than the last round of shots.  Elliot was 90% her sun-shiny self on Tuesday at work.  It went a little/a lot downhill starting at 7:30pm.  She was fussy and hard to settle down for sleep (which she hasn't been at bedtime in a while) and then she woke up at 12:30am, 2:30am and then every 30 minutes after that.  The nighttime report is courtesy of Josh since he was the one with her all night.  After a full day of work, hard bike ride and full night with his Young Life kids, he did night-time duty with Elliot.  I could not ask for a better partner is this! 

So, if you see Josh around town give him a hug and a pat on the back---the man is amazing!

8.12.2011

elliot weekly: 19 weeks


19 weeks

Roll On Over: Elliot rolled over for the first time this week!  Well, she rolled over from her back to her stomach.  So, I guess she technically rolled half-way over.  She did it twice on Wednesday afternoon.  I wish that I could have captured it on camera, but I was too giddy to think of it at the time.  Yep, the transformation to dorky-mom has commenced!

Sleeveless in Sleep: Elliot is no longer in the swaddle for sleep.  She's "free" as Josh liked to think of it (he never loved the idea of her all strapped in like that.)  We've got her in a sleeveless sleep sack.  The transition has been much easier than we thought.  We were running on over two weeks of Elliot waking up all night and breaking out of her swaddle.  Last Saturday, during the middle of the night and at our wits end, we tried out the sleep sack.  I had no idea that we were supposed to slowly transition her out of the swaddle (one arm, then both arms, then fully un-swaddled).  Bottom line---she's been napping just as good as with the swaddle and sleeping just as poorly at night ;)

Grab the Chupa: Josh and I aren't huge fans of the word "paci." My boss is from Colombia and his family uses the word chupete or chupa.  We've been trying to teach Elliot how to grab the chupa and put it in her mouth by herself (mostly in the hopes that she'll be able to put it in during the middle of the night and not wake us up, hahahaha!)  Josh and I were up at the neighborhood pool on Wednesday afternoon and Elliot just took the chupa out of my hand and put it in her mouth.  She can regularly put it in her mouth by herself if you hand it to her facing the right direction----and most of the time she can keep it in her mouth without knocking it out with her hands :)

Sleep, or rather the lack thereof: Yep, Elliot is still not sleeping through the night.  She'll wake up several times during the night.  She's pretty quick to settle down and get back to sleep, but still.....Josh and I are ready to get some consistent sleep.  Speaking of, Josh has been a lifesaver.  We've been trading off night duty; he'll have two nights on to take care of Elliot while I sleep and then the next two nights we switch off.  I don't think I could have asked for a more supportive husband!

8.11.2011

cook it: not your kid's chocolate chip cookies

I was stalking, I mean lurking, I mean oh-so-casually browsing Facebook when I saw that my friend Jordan was suggesting to my friend Hef that they make Jacques Torres Chocolate Chip Cookies. Since Josh is our resident cookie monster, I figured I try out the recipe.

Wow, the cookies are simply delish. I think the bittersweet chocolate and light sprinkling of sea salt on top make this a cookie that any true dessert connoisseur (uhm, or any girl with a craving) would enjoy. So get your workout clothes on friends...you're going to need to burn a few calories so you can enjoy these delectables. Or you can just enjoy an elastic waistband to eat a dozen or two---trust me, you're going to want to!

Recipe:
2 cups minus 2tbl cake flour
1 2/3 cups bread flour
1 1/4 tsp baking soda
1 1/2 tsp baking powder
1 1/2 tsp coarse salt
2 1/2 sticks unsalted butter
1 1/4 cups light brown sugar
1 cup plus 2 tbl granulated sugar
2 large eggs
2 tsp vanilla extract
1 1/4 pounds bittersweet chocolate (min of 60% cacao)
sea salt

1) sift flour, baking soda, baking powder and salt into bowl. set aside
2) cream butter and sugers together until creamy (about 5 minutes)
3) add eggs one at a time, beating well after each addition
4) add vanilla
5) slowly add in dry ingredients. mix until just combined.
6) stir in chocolate chips/pieces
-------now the hard part-------
7)cover the dough with saran wrap (not just the lid, but pressing saran wrap over top of dough)
8) refridgerate dough for 24-72 hours. the longer you wait the more the flavors increase. promise its worth the wait!
-------bring dough back to room temperature------
9)bake rounded tablespoons of dough at 350degrees for 10-12 minutes (don't worry about pressing the rounded balls down, they'll make perfect shapes without you having to do that!)

In true cheapo fashion, I used the ingredients we had on hand. Meaning, I used a mix of 60% and 100% cacao (I had to chop the 100% by hand) and only used swan's cake flour because I didn't have any bread flour. I did make sure to have the eggs and butter at room temperature, a trick I learned from the Magnolia Bakery cookbook. This was my first time using the cake flour. I had no idea that it was so much finer than traditional all-purpose flour---it certainly made a difference in the cookies. Josh didn't love the 100% cacao chips....I think it was because I had a hard time getting the chunks to be small without just ending up with shavings. Next go round I think I'll just use the 60% cacao morsels in the bag.
oh-so-yummy

8.10.2011

craft it: upcycled art

Josh helped me with this fabulous free upcycled art project. This project was inspired by my friend (and college roommate, go tigers!) Maury. You should totally check out her blog, its all about the fantastic projects she and her husband are doing to transform their new house. She's got tons of great ideas!

Maury had this project recently about using toilet paper and paper towel rolls to create fun free art. She said she got the idea from pinterest. So here's our version of her project. Straight from someone else, to pinterest, to Maury, to me to you

It didn't take too long to collect the paper towel and toilet paper tubes. Apparently we go through a lot of tp and pt at our house. Hmmmm, might have to look into that. Anyways, all you need after that is some hot glue (my current crafting obsession), spray paint and small finished nails for hanging.

Here was the wall I chose. You can see this wall (in our bathroom) from our bedroom. It hasn't every really seemed too bland to me before. I thought this wall would be a good place to test out the art. If we didn't like it, then no one else had to see how bad it turned out. And if it turned out great....then we'd just make another one for somewhere else in the house!


I don't have any "during" pictures of this project. Just too much playing with Elliot I guess! I 100% copied this design that was on Maury's blog.


I cut the pieces and glued them together. Josh and I agreed on using silver spray paint because a) we already had it at the house and b) we thought it would give it a iron-filigree kind of look. Josh did the spray painting (and came up with this ingenius way to get even coats!)


and where was the babe while we were doing all this crafting?
why right here of course!
(side note: elliot does have hair. it is just really blonde on top!)


Here's Josh in the tub. Hahaha, had to write that :) We used the very precise technique of eh-i-think-this-looks-ok-here-so-we'll-just-throw-a-few-nails-up-here-and-hope-for-the-best to hang up our new art:


here's an up close and personal shot:


15 toilet paper tubes: free!
shiny silver spray paint: free!
finishing nails: free!
hot glue: free!
grand total: free!
now that's the kind of math this mama likes


8.09.2011

craft it: fabric flowers

Josh and I stayed at home this past weekend. It was nice to have a weekend together where we weren't driving all over creation. Don't get me wrong---I have a lot of fun on our weekend adventures, but sometimes just staying home is nice.

You know what else is nice? When your husband takes care of the baby so you can craft! He sure does know the way to my heart.

I'm kind of obsessed with these super easy no-sew fabric flowers. I even included a template...hope it works!

You will need:
scrap fabric (i had tons left over from different projects)
glue gun
glue sticks
felt (or other scrap fabric)
scissors

Step 1: fold your selected fabric into a nice stack and trace your desired flower pattern

Step 2: trim your pattern. layers=petals...so the more layers you use the more petals you'll have. and the more petals you have will give you a more full flower

Step 3: fold your petal in half...then in half again. put a small spot of glue on the corner and adhere to small felt square

Step 4: repeat with three more petals to complete the bottom layer

Step 5: make another layer of 4 petals...be sure to place new petals on top of exposed seams...you want to be sure to cover up the felt backing! you can add more layers if you like. remember, the more layers the more the flower will look! you can also try adding smaller petals too...just reduce the template when you print it out.

Step 6: roll up center piece and glue in the middle

Step 7: put small drops of glue on base of surrounding petals. then, press the petals to the center piece. this will help it look more realistic...well, as realistic as a fabric flower could be!

Step 8: now fluff the flower. you're done!

I made nearly a zillion of these this past weekend. They got hot-glued to anything that would sit still. I put them on magnets, picture frames and pillows. See, check it out:
This previously crafted pillow was looking sloppy.

What it needed was some more flowers. See:

i think the trick was using several different types of flowers.

I put it in the guest room. See how much happier the bed looks?!

So what are you waiting for?!
Get fabric flower crazy!!
 
Images by Freepik